 Fig 9.1a: image on screen.
| |
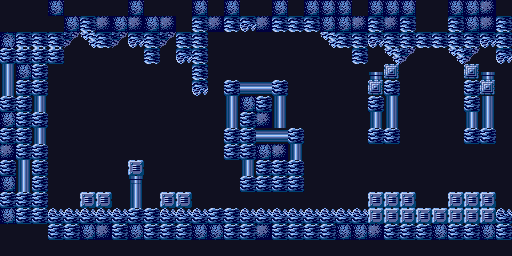
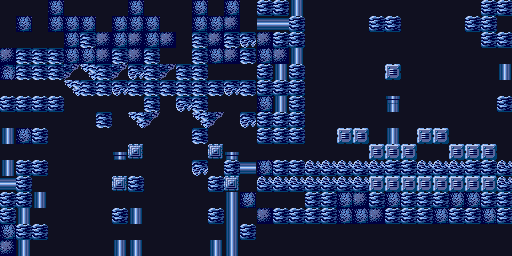
| The tile mapping process. Using the tileset of fig 9.1b, and the tile map of fig 9.1c, the end-result is fig 9.1a. | |
 Fig 9.1b: the tile set. |
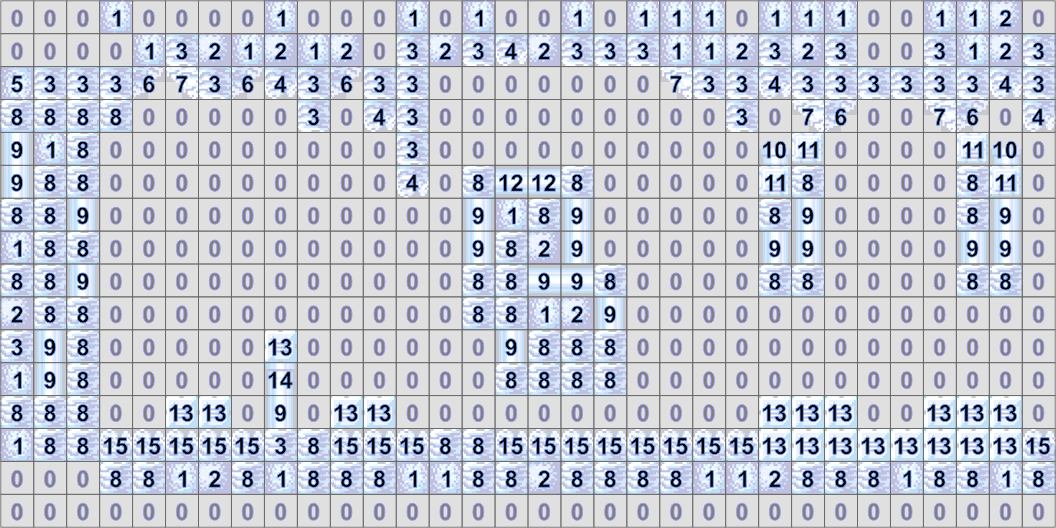 Fig 9.1c: the tile map (with the proper tiles as a backdrop). |
| Objects | Contents | Affine matrix |
Tilemaps are the bread and butter for the GBA. Almost every commercial GBA game makes use of tilemodes, with the bitmap modes seen only in 3D-like games that use ray-tracing. Everything else uses tiled graphics.
The reason why tilemaps are so popular is that they're implemented in hardware and require less space than bitmap graphics. Consider fig 9.1a. This is a 512 by 256 image, which even at 8bpp would take up 131 kB of VRAM, and we simply don't have that. If you were to make one big bitmap of a normal level in a game, you can easily get up to 1000×1000 pixels, which is just not practical. And then there's the matter of scrolling through the level, which means updating all pixels each frame. Even when your scrolling code is fully optimized that'd take quite a bit of time.
Now, notice that there are many repeated elements in this image. The bitmap seems to be divided into groups of 16×16 pixels. These are the tiles. The list of unique tiles is the tileset, which is given in fig 9.1b. As you can see, there are only 16 unique tiles making up the image. To create the image from these tiles, we need a tilemap. The image is divided into a matrix of tiles. Each element in the matrix has a tile index which indicates which tile should be rendered there; the tilemap can be seen in fig 9.1c.
Suppose both the tileset and map used 8bit entries, the sizes are 16×(16×16) = 4096 bytes for the tileset and 32×16 = 512 bytes for the tilemap. So that's 4.6 kB for the whole scene rather than the 131 kB we had before; a size reduction of a factor 28.
|
Fig 9.1a: image on screen.
| |
| The tile mapping process. Using the tileset of fig 9.1b, and the tile map of fig 9.1c, the end-result is fig 9.1a. | |
|
Fig 9.1b: the tile set. |
Fig 9.1c: the tile map (with the proper tiles as a backdrop). |
That's basically how tilemaps work. You don't define the whole image, but group pixels together into tiles and describe the image in terms of those groups. In the fig 9.1, the tiles were 16×16 pixels, so the tilemap is 256 times smaller than the bitmap. The unique tiles are in the tileset, which can (and usually will) be larger than the tilemap. The size of the tileset can vary: if the bitmap is highly variable, you'll probably have many unique tiles; if the graphics are nicely aligned to tile boundaries already (as it is here), the tileset will be small. This is why tile-engines often have a distinct look to them.
In the tiled video-modes (0, 1 and 2) you can have up to four backgrounds that display tilemaps. The size of the maps is set by the control registers and can be between 128×128 and 1024×1024 pixels. The size of each tile is always 8×8 pixels, so fig 9.1 isn't quite the way it'd work on the GBA. Because accessing the tilemaps is done in units of tiles, the map sizes correspond to 16×16 to 128×128 tiles.
Both the tiles and tilemaps are stored in VRAM, which is divided into charblocks and screenblocks. The tileset is stored in the charblocks and the tilemap goes into the screenblocks. In the common vernacular, the word “tile” is used for both the graphical tiles and the entries of the tilemaps. Because this is somewhat confusing, I'll use the term screen entry (SE for short) as the items in the screenblocks (i.e., the map entries) and restrict tiles to the tileset.
64 kB of VRAM is set aside for tilemaps
(0600:0000h-0600:FFFFh). This is used
for both screenblocks and charblocks. You can choose which
ones to use freely through the control registers, but be careful
that they can overlap (see table 9.1).
Each screenblock is
2048 (800h) bytes long, giving 32 screenblocks in
total. All but the smallest backgrounds use multiple screenblocks
for the full tilemap. Each charblock is 16 kB (4000h
bytes) long, giving four blocks overall.
| Memory | 0600:0000 | 0600:4000 | 0600:8000 | 0600:C000 | ||||||||
|---|---|---|---|---|---|---|---|---|---|---|---|---|
| charblock | 0 | 1 | 2 | 3 | ||||||||
| screenblock | 0 | … | 7 | 8 | … | 15 | 16 | … | 23 | 24 | … | 31 |
Both the entries of the tilemap and the data in the tileset are often referred to as ‘tiles’, which can make conversation confusing. I reserve the term ‘tile’ for the graphics, and ‘screen(block) entry’ or ‘map entry’ for the map's contents.
Charblocks and screenblocks use the same addresses in memory. When loading data, make sure the tiles themselves don't overwrite the map, or vice versa.
Size was one of the benefits of using tilemaps, speed was another. The rendering of tilemaps in done in hardware and if you've ever played PC games in hardware and software modes, you'll know that hardware is good. Another nice point is that scrolling is done in hardware too. Instead of redrawing the whole scene, you just have to enter some coordinates in the right registers.
As I said in the overview, there are three stages to setting up a tiled background: control, mapping and image-data. I've already covered most of the image-data in the overview, as well as some of the control and mapping parts that are shared by sprites and backgrounds alike; this chapter covers only things specific to backgrounds in general and regular backgrounds in particular. I'm assuming you've read the overview.
Just like sprites, there are two types of tiled backgrounds: regular and affine; these are also known as text and rotation backgrounds, respectively. The type of the background depends of the video mode (see table 9.2). At their cores, both regular and affine backgrounds work the same way: you have tiles, a tile-map and a few control registers. But that's where the similarity ends. Affine backgrounds use more and different registers than regular ones, and even the maps are formatted differently. This page only covers the regular backgrounds. I'll leave the affine ones till after the page on the affine matrix.
| mode | BG0 | BG1 | BG2 | BG3 |
|---|---|---|---|---|
| 0 | reg | reg | reg | reg |
| 1 | reg | reg | aff | - |
| 2 | - | - | aff | aff |
All backgrounds have 3 primary control registers. The primary control
register is REG_BGxCNT, where x indicates
the backgrounds 0 through 3. This register is where you say what the
size of the tilemap is, and which charblock and screenblock it
uses. The other two are the scrolling registers,
REG_BGxHOFS and REG_BGxVOFS.
Each of these is a 16it register. REG_BG0CNT can
be found at 0400:0008, with the other controls right
behind it. The offsets are paired by background, forming coordinate
pairs. These start at 0400:0010
| Register | length | address |
|---|---|---|
| REG_BGxCNT | 2 | 0400:0008h + 2·x |
| REG_BGxHOFS | 2 | 0400:0010h + 4·x |
| REG_BGxVOFS | 2 | 0400:0012h + 4·x |
The description of REG_BGxCNT can be found in
table 9.4. Most of it is pretty standard,
except for the size: there are actually two lists of possible
sizes; one for regular maps and one for affine maps. The both use the
same bits you may have to be careful that you're using the right
#defines.
| F E | D | C B A 9 8 | 7 | 6 | 5 4 | 3 2 | 1 0 |
| Sz | Wr | SBB | CM | Mos | - | CBB | Pr |
| bits | name | define | description |
|---|---|---|---|
| 0-1 | Pr | BG_PRIO# | Priority. Determines drawing order of backgrounds. |
| 2-3 | CBB | BG_CBB# | Character Base Block. Sets the charblock that serves as the base for character/tile indexing. Values: 0-3. |
| 6 | Mos | BG_MOSAIC | Mosaic flag. Enables mosaic effect. |
| 7 | CM | BG_4BPP, BG_8BPP | Color Mode. 16 colors (4bpp) if cleared; 256 colors (8bpp) if set. |
| 8-C | SBB | BG_SBB# | Screen Base Block. Sets the screenblock that serves as the base for screen-entry/map indexing. Values: 0-31. |
| D | Wr | BG_WRAP | Affine Wrapping flag. If set, affine background wrap around at their edges. Has no effect on regular backgrounds as they wrap around by default. |
| E-F | Sz | BG_SIZE#, see below | Background Size. Regular and affine backgrounds have different sizes available to them. The sizes, in tiles and in pixels, can be found in table 9.5. |
|
|
Each background has two 16bit scrolling registers to offset the
rendering (REG_BGxHOFS and
REG_BGxVOFS). There are a number of interesting
points about these. First, because regular backgrounds wrap around,
the values are essentially modulo mapsize. This is not
really relevant at the moment, but you can use this to your benefit
once you get to more advanced tilemaps. Second, these registers are
write-only! This is a little annoying, as it means that you
can't update the position by simply doing `REG_BG0HOFS++'
and the like.
And now the third part, which may be the most important, namely what the values actually do. The simplest way of looking at them is that they give the coordinates of the screen on the map. Read that again, carefully: it's the position of the screen on the map. It is not the position of the map on the screen, which is how sprites work. The difference is only a minus sign, but even something as small as a sign change can wreak havoc on your calculations.
So, if you increase the scrolling values, you move the screen to the right, which corresponds to the map moving left on the screen. In mathematical terms, if you have map position p and screen position q, then the following is true:
| (9.1) |
|
The offset registers REG_BGxHOFS and REG_BGxVOFS indicate which map location is mapped to the top-left of the screen, meaning positive offsets scroll the map left and up. Watch your minus signs.
The offset registers are write-only! That means that direct
arithmetic like ‘+=’ will not work.
Tonc's code has several useful extra types and macros that can make life a little easier.
// === Additional types (tonc_types.h) ================================

//! Screen entry conceptual typedef
typedef u16 SCR_ENTRY;

//! Affine parameter struct for backgrounds, covered later
typedef struct BG_AFFINE
{
    s16 pa, pb;
    s16 pc, pd;
    s32 dx, dy;
} ALIGN4 BG_AFFINE;

//! Regular map offsets
typedef struct BG_POINT
{
    s16 x, y;
} ALIGN4 BG_POINT;

//! Screenblock struct
typedef SCR_ENTRY   SCREENBLOCK[1024];


// === Memory map #defines (tonc_memmap.h) ============================

//! Screen-entry mapping: se_mem[y][x] is SBB y, entry x
#define se_mem          ((SCREENBLOCK*)MEM_VRAM)

//! BG control register array: REG_BGCNT[x] is REG_BGxCNT
#define REG_BGCNT      ((vu16*)(REG_BASE+0x0008))

//! BG offset array: REG_BG_OFS[n].x/.y is REG_BGnHOFS / REG_BGnVOFS
#define REG_BG_OFS      ((BG_POINT*)(REG_BASE+0x0010))

//! BG affine params array
#define REG_BG_AFFINE   ((BG_AFFINE*)(REG_BASE+0x0000))
Strictly speaking, making a SCREEN_ENTRY typedef is not necessary,
but makes its use clearer. se_mem works much like
tile_mem: it maps out VRAM into screenblocks
screen-entries, making finding a specific entry easier. The other
typedefs are used to map out arrays for the background registers. For
example, REG_BGCNT is an array that maps out all
REG_BGxCNT registers. REG_BGCNT[0] is REG_BG0CNT, etc.
The BG_POINT and BG_AFFINE types are used in similar fashions. Note
that REG_BG_OFS still covers the same registers as REG_BGxHOFS and
REG_BGxVOFS do, and the write-only-ness of them has not magically
disappeared. The same goes for REG_BG_AFFINE, but that discussion will
be saved for another time.
In theory, it is also useful create a sort of background API, with a struct with the temporaries for map positioning and functions for initializing and updating the registers and maps. However, most of tonc's demos are not complex enough to warrant these things. With the types above, manipulating the necessary items is already simplified enough for now.
The screenblocks form a matrix of screen entries that describe the full image on the screen. In the example of fig 9.1 the tilemap entries just contained the tile index. The GBA screen entries bahave a little differently.
For regular tilemaps, each screen entry is 16bits long. Besides the tile index, it contains flipping flags and a palette bank index for 4bpp / 16 color tiles. The exact layout can be found in table 9.7. The affine screen entries are only 8 bits wide and just contain an 8bit tile index.
| F E D C | B | A | 9 8 7 6 5 4 3 2 1 0 |
| PB | VF | HF | TID |
| bits | name | define | description |
|---|---|---|---|
| 0-9 | TID | SE_ID# | Tile-index of the SE. |
| A-B | HF, VF | SE_HFLIP, SE_VFLIP. SE_FLIP# | Horizontal/vertical flipping flags. |
| C-F | PB | SE_PALBANK# | Palette bank to use when in 16-color mode. Has no effect
for 256-color bgs (REG_BGxCNT{6} is set).
|
VRAM contains 32 screenblocks to store the tilemaps in. Each
screenblock is 800h bytes long, so you can fit 32×32
screen entries into it, which equals one 256×256 pixel
map. The bigger maps simply use more than one screenblock.
The screenblock index set in REG_BGxCNT is the
screen base block which indicates the start of
the tilemap.
Now, suppose you have a tilemap that's tw×th tiles/SEs in size. You might expect that the screen entry at tile-coordinates (tx, ty) could be found at SE-number n = tx+ty·tw, because that's how matrices always work, right? Well, you'd be wrong. At least, you'd be partially wrong.
Within each screenblock the equation works, but the bigger backgrounds don't simply use multiple screenblocks, they're actually accessed as four separate maps. How this works can be seen in table 9.8: each numbered block is a contingent block in memory. This means that to get the SE-index you have to find out which screenblock you are in and then find the SE-number inside that screenblock.
| 32x32 | 64x32 | 32x64 | 64x64 | |||||||||
|---|---|---|---|---|---|---|---|---|---|---|---|---|
|
|
|
|
This kind of nesting problem isn't as hard as it looks. We know how many tiles fit in a screenblock, so to get the SBB-coordinates, all we have to do divide the tile-coords by the SBB width and height: sbx=tx/32 and sby=ty/32. The SBB-number can then be found with the standard matrix→array formula. To find the in-SBB SE-number, we have to use tx%32 and ty%32 to find the in-SBB coordinates, and then again the conversion from 2D coords to a single element. This is to be offset by the SBB-number tiles the size of an SBB to find the final number. The final form would be:
//! Get the screen entry index for a tile-coord pair
//  And yes, the div and mods will be converted by the compiler
uint se_index(uint tx, uint ty, uint pitch)
{
    uint sbb= (ty/32)*(pitch/32) + (tx/32);
    return sbb*1024 + (ty%32)*32 + tx%32;
}
The general formula is left as an exercise for the reader – one that is well worth the effort, in my view. This kind of process crops up in a number of places, like getting the offset for bitmap coordinates in tiles, and tile coords in 1D object mapping.
If all those operations make you queasy, there's also a faster version specifically for a 2×2 arrangement. It starts with calculating the number as if it's a 32×32t map. This will be incorrect for a 64t wide map, which we can correct for by adding 0x0400−0x20 (i.e., tiles/block − tiles per row). We need another full block correction is the size is 64×64t.
//! Get the screen entry index for a tile-coord pair.
/*! This is the fast (and possibly unsafe) way.
*   \param bgcnt    Control flags for this background (to find its size)
*/

uint se_index_fast(uint tx, uint ty, u16 bgcnt)
{
    uint n= tx + ty*32;
    if(tx >= 32)
        n += 0x03E0;
    if(ty >= 32 && (bgcnt&BG_REG_64x64)==BG_REG_64x64)
        n += 0x0400;
    return n;
}
I would like to remind you that n here is the SE-number, not the
address. Since the size of a regular SE is 2 bytes, you need to
multiply n by 2 for the address. (Unless, of course, you have
a pointer/array of u16s, in which case n will work
fine.) Also, this works for regular backgrounds only; affine
backgrounds use a linear map structure, which makes this extra work
unnecessary there.
By the way, both the screen-entry and map layouts are different for
affine backgrounds. For their formats, see the
map format section of the affine
background page.
There are two additional things you need to be aware of when using tiles for tile-maps. The first concerns tile-numbering. For sprites, numbering went according to 4bit tiles (s-tiles); for 8bit tiles (d-tiles) you'd have use multiples of 2 (a bit like u16 addresses are always multiples of 2 in memory). In tile-maps, however, d-tiles are numbered by the d-tile. To put it in other words, for sprites, using index id indicates the same tile for both 4 and 8bit tiles, namely the one that starts at id·20h. For tile-maps, however, it starts at id·20h for 4bit tiles, but at id·40h for 8bit tiles.
| memory offset | 000h | 020h | 040h | 060h | 080h | 100h | ... |
|---|---|---|---|---|---|---|---|
| 4bpp tile | 0 | 1 | 2 | 3 | 4 | 5 | ... |
| 8bpp tile | 0 | 1 | 2 | ... | |||
The second concerns, well, also tile-numbering, but more how many
tiles you can use. Each map entry for regular backgrounds has 10 bits
for a tile index, so you can use up to 1024 tiles. However, a quick
calculation shows that a charblock contains 4000h/20h= 512 s-tiles,
or 4000h/40h= 256 d-tiles. So what's the deal here? Well, the
charblock index you set in REG_BGxCNT is actually only
the block where tile-counting starts: its character base
block. You can use the ones after it as well. Cool, huh? But
wait, if you can access subsequent charblocks as well; does this mean
that, if you set the base charblock to 3, you can use the sprite
blocks (which are basically blocks 4 and 5) as well?
The answer is: yes. And NO!
The emulators I've tested on do allow you to do this. However, a real GBA doesn't. It does output something, though: the screen-entry will be used as tile-data itself, but in a manner that simply defies explanation. Trust me on this one, okay? Of the current tonc demos, this is one of the few times that VBA gets it wrong.
For both 4bpp and 8bpp regular bgs, you can access 1024 tiles. The only caveat here is that you cannot access the tiles in the object charblocks even if the index would call for it.
Another thing you may be wondering is if you can use a particular screenblock that is within a currently used charblock. For example, is it allowed to have a background use charblock 0 and screenblock 1. Again, yes you can do this. This can be useful since you're not likely to fill an entire charblock, so using its later screenblocks for your map data is a good idea. (A sign of True Hackerdom would be if you manage to use the same data for both tiles and SEs and still get a meaningful image (this last part is important). If you have done this, please let me know.)
A converter that can tile images (for objects), can also create a tileset for tilemaps, although there will likely be many redundant tiles. A few converters can also reduce the tileset to only the unique tiles, and provide the tilemap that goes with it. The Brinstar bitmap from fig 9.1 is a 512×256 image, which could be tiled to a 64x32 map with a 4bpp tileset reduced for uniqueness in tiles, including palette info and mirroring.
# gfx2gba
# (C array; u8 foo_Tiles[], u16 foo_Map[],
# u16 master_Palette[]; foo.raw.c, foo.map.c, master.pal.c)
	gfx2gba -fsrc -c16 -t8 -m foo.bmp
# grit
# (C array; u32 fooTiles[], u16 fooMap[], u16 fooPal[]; foo.c, foo.h)
	grit foo.bmp -gB4 -mRtpf
Two notes on gfx2gba: First, it merges the palette to a single 16-color array, rearranging it in the process. Second, while it lists metamapping options in the readme, it actually doesn't give a metamap and meta-tileset, it just formats the map into different blocks.
There are four demos in this chapter. The first one is brin_demo, which is very, very short and shows the basic steps of tile loading and scrolling. The next ones are called sbb_reg and cbb_demo, which are tech demos, illustrating the layout of multiple screenblocks and how tile indexing is done on 4bpp and 8bpp backgrounds. In both these cases, the map data is created manually because it's more convenient to do so here, but using map-data created by map editors really isn't that different.
As I've been using a 512×256 part of Brinstar throughout this chapter, I thought I might as well use it for a demo.
There are a few map editors out there that you can use. Two good ones are Nessie's MapEd or Mappy, both of which have a number of interesting features. I have my own map editor, mirach, but it's just a very basic thing. Some tutorials may point you to GBAMapEditor. Do not use this editor as it's pretty buggy, leaving out half of the tilemaps sometimes. Tilemaps can be troublesome enough for beginners without having to worry about whether the map data is faulty.
In this cause, however, I haven't used any editor at all. Some of the graphics converters can convert to a tileset+tilemap – it's not the standard method, but for small maps it may well be easier. In this case I've used Usenti to do it, but grit and gfx2gba work just as well. Note that because the map here is 64×32 tiles, which requires splitting into screenblocks. In Usenti this is called the ‘sbb’ layout, in grit it's ‘-mLs’ and for gfx2gba you'd use ‘-mm 32’ … I think. In any case, after a conversion you'd have a palette, a tileset and a tilemap.
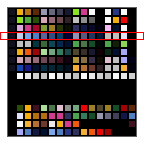 Fig 9.3a: brin_demo palette. |
const unsigned short brinMap[2048]= { // Map row 0 0x0000,0x0000,0x0000,0x0000,0x0000,0x0000,0x3001,0x3002, 0x0000,0x0000,0x0000,0x0000,0x0000,0x0000,0x0000,0x0000, 0x3001,0x3002,0x0000,0x0000,0x0000,0x0000,0x0000,0x0000, 0x3001,0x3002,0x0000,0x0000,0x3001,0x3002,0x0000,0x0000, // Map row 1 0x0000,0x0000,0x0000,0x0000,0x0000,0x0000,0x3003,0x3004, 0x0000,0x0000,0x0000,0x0000,0x0000,0x0000,0x0000,0x0000, 0x3003,0x3004,0x0000,0x0000,0x0000,0x0000,0x0000,0x0000, 0x3003,0x3004,0x0000,0x0000,0x3003,0x3004,0x0000,0x0000, // Map row 2 0x0000,0x0000,0x0000,0x0000,0x0000,0x0000,0x0000,0x0000, 0x3001,0x3002,0x3005,0x3006,0x3007,0x3008, // ... etc |
 Fig 9.3b: brin_demo tileset. |
In fig 9.3 you can see the full palette,
the tileset and part of the map. Note that the tileset of
fig 9.3b is not the same as that of
fig 9.1b because the former uses 8×8
tiles while the latter used 16×16 tiles. Note also that the
screen entries you see here are either 0 (i.e., the empty tile)
or of the form 0x3xxx. The high nybble indicates
the palette bank, in this case three. If you'd look to the palette
(fig 9.3a) you'd see that this gives
bluish colors.
Now on to using these data. Remember the essential steps here:
If you do it correctly, you should have something showing on screen.
If not, go to the tile/map/memory viewers of your emulator; they'll
usually give you a good idea where the problem is. A common one is
having a mismatch between the CBB and SBB in
REG_BGxCNT and where you put the data, which most
likely would leave you with an empty map or empty tileset.
The full code of brin_demo is given below. The three
calls to memcpy() load up the palette, tileset and
tilemap. For some reason, it's become traditional to place the maps in
the last screenblocks. In this case, that's 30 rather than 31 because
we need two blocks for a 64×32t map. For the scrolling part,
I'm using two variables to store and update the positions because
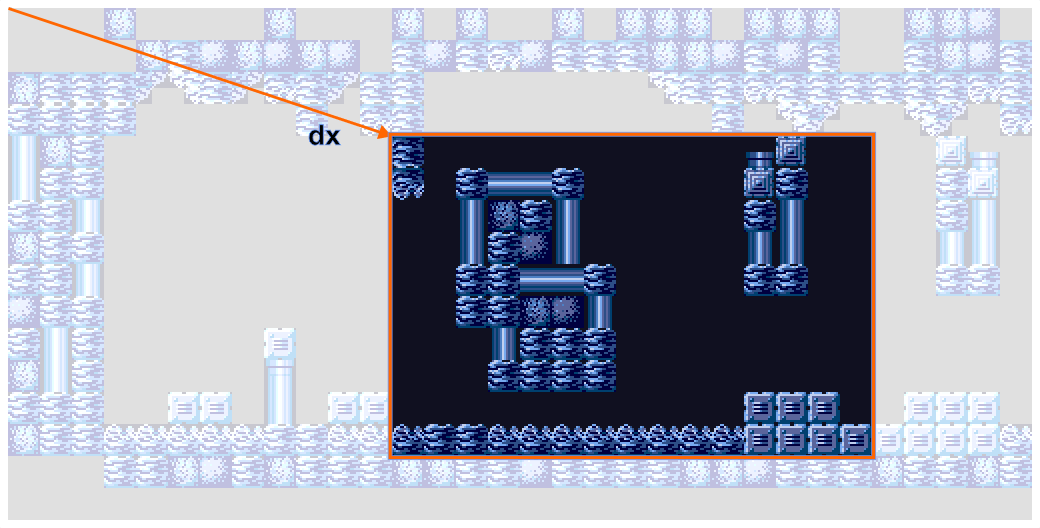
the scrolling registers are write-only. I'm starting at (192, 64)
here because that's what I used for the scrolling picture of
fig 9.2 earlier.
#include <string.h>

#include "toolbox.h"
#include "input.h"
#include "brin.h"

int main()
{
    // Load palette
    memcpy(pal_bg_mem, brinPal, brinPalLen);
    // Load tiles into CBB 0
    memcpy(&tile_mem[0][0], brinTiles, brinTilesLen);
    // Load map into SBB 30
    memcpy(&se_mem[30][0], brinMap, brinMapLen);

    // set up BG0 for a 4bpp 64x32t map, using
    //   using charblock 0 and screenblock 31
    REG_BG0CNT= BG_CBB(0) | BG_SBB(30) | BG_4BPP | BG_REG_64x32;
    REG_DISPCNT= DCNT_MODE0 | DCNT_BG0;

    // Scroll around some
    int x= 192, y= 64;
    while(1)
    {
        vid_vsync();
        key_poll();

        x += key_tri_horz();
        y += key_tri_vert();

        REG_BG0HOFS= x;
        REG_BG0VOFS= y;
    }

    return 0;
}
 Fig 9.4a: brin_demo at dx=(192, 64). |
 Fig 9.4b: brin_demo at dx=(0, 0). |
This is not exactly required knowledge, but should make for an interesting read. In this demo I use a multi-sbb map that was already prepared for that. The converter made sure that the left block of the map came before the right block. If this weren't the case then you couldn't load the whole map in one go because the second row of the left block would use the first row of the right block and so on (see fig 9.5).
There are few simple and slow ways and one simple and fast way of copying a non sbb-prepared map to a multiple screenblocks. The slow way would be to perform a double loop to go row by row of each screenblock. The fast way is through struct-copies and pointer arithmetic, like this:
typedef struct { u32 data[8]; } BLOCK;

int iy;
BLOCK *src= (BLOCK*)brinMap;
BLOCK *dst0= (BLOCK*)se_mem[30];
BLOCK *dst1= (BLOCK*)se_mem[31];

for(iy=0; iy<32; iy++)
{
    // Copy row iy of the left half
   *dst0++= *src++;     *dst0++= *src++;

     // Copy row iy of the right half
   *dst1++= *src++;     *dst1++= *src++;
}
A BLOCK struct-copy takes care of half a row, so
two takes care of a whole screenblock row (yes, you could define
BLOCK as a 16-word struct, but that wouldn't work
out anymore. Trust me). At that point, the src pointer
has arrived at the right half of the map, so we copy the next row
into the right-hand side destination, dst1. When
done with that, src points to the second row of the
left side. Now do this for all 32 lines. Huzzah for struct-copies,
and pointers!
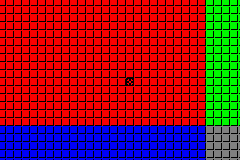
The second demo, sbb_reg uses a 64x64t background to
indicate how multiple screenblocks are used for bigger maps in
more detail. While the brin_demo used a multi-sbb map
as well, it wasn't easy to see what's what because the map was
irregular; this demo uses a very simple tileset so you
can clearly see the screenblock boundaries. It'll also show how
you can use the REG_BG_OFS registers for scrolling
rather than REG_BGxHOFS and
REG_BGxVOFS.
#include "toolbox.h"
#include "input.h"

#define CBB_0  0
#define SBB_0 28

#define CROSS_TX 15
#define CROSS_TY 10

BG_POINT bg0_pt= { 0, 0 };
SCR_ENTRY *bg0_map= se_mem[SBB_0];


uint se_index(uint tx, uint ty, uint pitch)
{
    uint sbb= ((tx>>5)+(ty>>5)*(pitch>>5));
    return sbb*1024 + ((tx&31)+(ty&31)*32);
}

void init_map()
{
    int ii, jj;

    // initialize a background
    REG_BG0CNT= BG_CBB(CBB_0) | BG_SBB(SBB_0) | BG_REG_64x64;
    REG_BG0HOFS= 0;
    REG_BG0VOFS= 0;

    // (1) create the tiles: basic tile and a cross
    const TILE tiles[2]=
    {
        {{0x11111111, 0x01111111, 0x01111111, 0x01111111,
          0x01111111, 0x01111111, 0x01111111, 0x00000001}},
        {{0x00000000, 0x00100100, 0x01100110, 0x00011000,
          0x00011000, 0x01100110, 0x00100100, 0x00000000}},
    };
    tile_mem[CBB_0][0]= tiles[0];
    tile_mem[CBB_0][1]= tiles[1];

    // (2) create a palette
    pal_bg_bank[0][1]= RGB15(31,  0,  0);
    pal_bg_bank[1][1]= RGB15( 0, 31,  0);
    pal_bg_bank[2][1]= RGB15( 0,  0, 31);
    pal_bg_bank[3][1]= RGB15(16, 16, 16);

    // (3) Create a map: four contingent blocks of
    //   0x0000, 0x1000, 0x2000, 0x3000.
    SCR_ENTRY *pse= bg0_map;
    for(ii=0; ii<4; ii++)
        for(jj=0; jj<32*32; jj++)
            *pse++= SE_PALBANK(ii) | 0;
}

int main()
{
    init_map();
    REG_DISPCNT= DCNT_MODE0 | DCNT_BG0 | DCNT_OBJ;

    u32 tx, ty, se_curr, se_prev= CROSS_TY*32+CROSS_TX;

    bg0_map[se_prev]++; // initial position of cross
    while(1)
    {
        vid_vsync();

        key_poll();

        // (4) Moving around
        bg0_pt.x += key_tri_horz();
        bg0_pt.y += key_tri_vert();

        // (5) Testing se_index
        // If all goes well the cross should be around the center of
        // the screen at all times.
        tx= ((bg0_pt.x>>3)+CROSS_TX) & 0x3F;
        ty= ((bg0_pt.y>>3)+CROSS_TY) & 0x3F;

        se_curr= se_index(tx, ty, 64);
        if(se_curr != se_prev)
        {
            bg0_map[se_prev]--;
            bg0_map[se_curr]++;
            se_prev= se_curr;
        }

        REG_BG_OFS[0]= bg0_pt;  // write new position
    }
    return 0;
}
The init_map() contains all of the initialization
steps: setting up the registers, tiles, palettes and maps.
Unlike the previous demo, the tiles, palette and the map are
all created manually because it's just easier in this case. At point
(1), I define two tiles. The first one looks a little like a pane
and the second one is a rudimentary cross. You can see them clearly
in the screenshot (fig 9.6). The
pane-like tile is loaded into tile 0,
and is therefore the ‘default’ tile for the map.
The palette is set at point (2). The colors are the same as in table 9.8: red, green, blue and grey. Take note of which palette entries I'm using: the colors are in different palette banks so that I can use palette swapping when I fill the map. Speaking of which …
Loading the map itself (point (3)) happens through a double loop. The outer loop sets the palette-bank for the screen entries. The inner loop fills 1024 SEs with palette-swapped tile-0's. Now, if big maps used a flat layout, the result would be a big map in four colored bands. However, what actually happens is that you see blocks, not bands, proving that indeed regular maps are split into screenblocks just like table 9.8 said. Yes, it's annoying, but that's just the way it is.
That was creating the map, now we turn to the main loop in
main(). The keys (point (4)) let you scroll around
the map. The RIGHT button is tied to a positive change in x,
but the map itself actually scrolls to the left! When I say
it like that it may seem counter-intuitive, but if you look at the
demo you see that it actually makes sense. Think of it from a
hypothetical player sprite point of view. As the sprite moves through
the world, you need to update the background to keep the sprite from
going off-screen. To do that, the background's movement should be
the opposite of the sprite's movement. For example, if the sprite
moves to the right, you have to move the background to the
left to compensate.
Finally, there's one more thing to discuss: the cross that appears
centered on the map. To do this as you scroll along, I keep track of
the screen-entry at the center of the screen via a number of
variables and the se_index() function. Variables
tx and ty are the tile coordinates of the
center of the screen, found by shifting and masking the background
pixel coordinates. Feeding these to se_index() gives me
the screen-entry offset from the screen base block. If this is
different than the previous offset, I repaint the former offset as
a pane, and update the new offset to the cross. That way, the cross
seems to move over the map; much like a sprite would. This
was actually designed as a test for se_index(); if the
function was flawed, the cross would just disappear at some point.
But it doesn't. Yay me ^_^
The third demo, cbb_demo covers some of the details of charblocks and the differences in 4bpp and 8bpp tiles. The backgrounds in question are BG 0 and BG 1. Both will be 32x32t backgrounds, but BG 0 will use 4bpp tiles and CBB 0 and BG 2 uses 8bpp tiles and CBB 2. The exact locations and contents of the screenblocks are not important; what is important is to load the tiles to the starts of all 6 charblocks and see what happens.
#include <toolbox.h>
#include "cbb_ids.h"

#define CBB_4 0
#define SBB_4 2

#define CBB_8 2
#define SBB_8 4

void load_tiles()
{
    int ii;
    TILE *tl= (TILE*)ids4Tiles;
    TILE8 *tl8= (TILE8*)ids8Tiles;

    // Loading tiles. don't get freaked out on how it looks
    // 4-bit tiles to blocks 0 and 1
    tile_mem[0][1]= tl[1];      tile_mem[0][2]= tl[2];
    tile_mem[1][0]= tl[3];      tile_mem[1][1]= tl[4];
    // and the 8-bit tiles to blocks 2 though 5
    tile8_mem[2][1]= tl8[1];    tile8_mem[2][2]= tl8[2];
    tile8_mem[3][0]= tl8[3];    tile8_mem[3][1]= tl8[4];
    tile8_mem[4][0]= tl8[5];    tile8_mem[4][1]= tl8[6];
    tile8_mem[5][0]= tl8[7];    tile8_mem[5][1]= tl8[8];

    // And let's not forget the palette (yes, obj pal too)
    u16 *src= (u16*)ids4Pal;
    for(ii=0; ii<16; ii++)
        pal_bg_mem[ii]= pal_obj_mem[ii]= *src++;
}

void init_maps()
{
    // se4 and se8 map coords: (0,2) and (0,8)
    SB_ENTRY *se4= &se_mem[SBB_4][2*32], *se8= &se_mem[SBB_8][8*32];
    // show first tiles of char-blocks available to bg0
    // tiles 1, 2 of char-block CBB_4
    se4[0x01]= 0x0001;      se4[0x02]= 0x0002;

    // tiles 0, 1 of char-block CBB_4+1
    se4[0x20]= 0x0200;      se4[0x21]= 0x0201;

    // show first tiles of char-blocks available to bg1
    // tiles 1, 2 of char-block CBB_8 (== 2)
    se8[0x01]= 0x0001;      se8[0x02]= 0x0002;

    // tiles 1, 2 of char-block CBB_8+1
    se8[0x20]= 0x0100;      se8[0x21]= 0x0101;

    // tiles 1, 2 of char-block CBB_8+2 (== CBB_OBJ_LO)
    se8[0x40]= 0x0200;      se8[0x41]= 0x0201;

    // tiles 1, 2 of char-block CBB_8+3 (== CBB_OBJ_HI)
    se8[0x60]= 0x0300;      se8[0x61]= 0x0301;
}

int main()
{
    load_tiles();
    init_maps();

    // init backgrounds
    REG_BG0CNT= BG_CBB(CBB_4) | BG_SBB(SBB_4) | BG_4BPP;
    REG_BG1CNT= BG_CBB(CBB_8) | BG_SBB(SBB_8) |  BG_8BPP;
	// enable backgrounds
    REG_DISPCNT= DCNT_MODE0 | DCNT_BG0 | DCNT_BG1 | DCNT_OBJ;

    while(1);

    return 0;
}
The tilesets can be found in cbb_ids.c. Each tile contains two numbers: one for the charblock I'm putting it and one for the tile-index in that block. For example, the tile that I want in charblock 0 at tile 1 shows ‘01’, CBB 1 tile 0 shows ‘10’, CBB 1, tile 1 has ‘11’, etc. I have twelve tiles in total, 4 s-tiles to be used for BG 0 and 8 d-tiles for BG 1.
Now, I have six pairs of tiles and I intend to place them
in the first tiles of each of the 6 charblock (except for CBBs 0
and 2, where tile 0 would be used as default tiles for the
background, which I want to keep empty). Yes six, I'm loading into
the sprite charblocks as well.
I could do this by hand, calculating all the
addresses manually (0600:0020 for CBB 0, tile 1, etc)
and hope I don't make a mistake and can remember what I'm doing
when revisiting the demo later, or I can just use my
tile_mem and tile8_mem memory map
matrices and get the addresses quickly and without any hassle. Even
better, C allows struct assignments so I can load the individual
tiles with a simple assignment!
That is exactly what I'm doing in load_tiles(). The
source tiles are cast to TILE and TILE8 arrays for 4bpp and 8bpp
tiles respectively. After that, loading the tiles is very simple
indeed.
The maps themselves are created in init_maps(). The only
thing I'm interested in for this demo is to show how and which
charblocks are used, so the particulars of the map aren't that
important. The only thing I want them to do is to be able to show
the tiles that I loaded in load_tiles(). The two pointers
I create here, se4 and se8, point to
screen-entries in the screenblocks used for BG 0 and BG 1,
respectively. BG 0's map, containing s-tiles, uses 1 and 512
offsets; BG 1's entries, 8bpp tiles, carries 1 and 256 offsets.
If what I said before about tile-index for different bitdepths is
true, then you should see the contents of all the loaded tiles. And
looking at the result of the demo
(fig 9.7), it looks as if I did my
math correctly: background tile-indices follow the bg's assigned
bitdepth, in contrast to sprites which always counts in 32 byte
offsets.
There is, however, one point of concern: on hardware, you won't see the tiles that are actually in object VRAM (blocks 4 and 5). While you might expect to be able to use the sprite blocks for backgrounds due to the addresses, the actual wiring in the GBA seems to forbid it. This is why you should test on hardware is important: emulators aren't always perfect. But if hardware testing is not available to you, test on multiple emulators; if you see different behaviour, be wary of the code that produced it.
 Fig 9.7a: cbb_demo on VBA (and Boycott Adv and Mappy well, almost) ). |
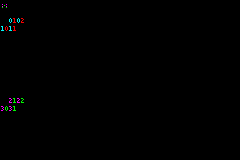 Fig 9.7b: cbb_demo on hardware. Spot the differences! |
Woo, bonus demo! This example will serve a number of purposes. The first is to introduce tonclib, a library of code to make life on the GBA a bit easier. In past demos, I've been using toolbox.h/c to store useful macros and functions. This is alright for very small projects, but as code gets added, it becomes very hard to maintain everything. It's better to store common functionality in libraries that can be shared among projects.
The second reason is to show how you can output text, which is obviously an important ability to have. Tonclib has an extensive list of options for text rendering – too much to explain here – but its interface is pretty easy. For details, visit the Tonc Text Engine chapter.
Anyway, here's the example.
#include <stdio.h>
#include <tonc.h>

int main()
{
    REG_DISPCNT= DCNT_MODE0 | DCNT_BG0;

    // Init BG 0 for text on screen entries.
    tte_init_se_default(0, BG_CBB(0)|BG_SBB(31));

    tte_write("#{P:72,64}");        // Goto (72, 64).
    tte_write("Hello World!");      // Print "Hello world!"

    while(1);

    return 0;
}
 Fig 9.8a: hello demo. |
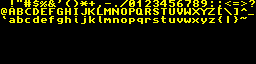 Fig 9.8b: tileset of the hello demo. |
Yes, it is indeed a “hello world” demo, the starting point
of nearly every introductory C/C++ tutorial. However, those are usually
for meant for PC platforms, which have native console functionality like
printf() or cout. These do not exist for the
GBA. (Or “didn't”, I should say; there are ways to make
use of them nowadays. See tte:conio
for details.)
Tonc's support for text goes through tte_ functions. In
this case, tte_init_se_default() sets up background 0
for tile-mapped text. It also loads the default 8×8 font into
charblock 0 (see fig 9.8b). After
that, you can write to text with tte_write. The sequence
#{P:x,y} is the formatting command that
TTE uses to position the cursor. There are a number of these, some of
which you'll also see in later chapters.
From this point on, I'll make liberal use of tonclib's text capabilities in examples for displaying values and the like. This will mostly happen without explanation, because that won't be part of the demo. Again, to see the internals, go to the TTE chapter.
Using the functions themselves is pretty simple, but they are spread out over multiple files and reference even more. This makes it a hassle to find which files you need to add to the list of sources to compile a project. You could add everything, of course, but that's not a pleasant prospect either. The best solution is to pre-compile the utility code into a library.
Libraries are essentially clusters of object files. Instead of linking the objects into an executable directly, you archive them with arm-none-eabi-ar. The command is similar to the link step as well. Here is how you can create the library libfoo.a from objects foo.o, bar.o and baz.o.
# archive rule
libfoo : foo.o bar.o baz.o
	arm-none-eabi-ar -crs libfoo.a foo.o bar.o baz.o
# shorthand rule: $(AR) rcs $@ $^
The three flags stand for create archive, replace member and create symbol table, respectively. For more on these and other archiving flags, I will refer you to the manual, which is part of the binutils toolset. The flags are followed by the library name, which is followed by all the objects (the ‘members’ you want to archive).
To use the library, you have to link it to the executable. There are two linker flags of interest here: -L and -l. Upper- and lowercase ‘L’. The former, -L adds a library path. The lowercase version, -l, adds the actual library, but there is a twist here: only need the root-name of the library. For example, to link the library libfoo.a, use ‘-lfoo’. The prefix lib and extension .a are assumed by the linker.
# using libfoo (assume it's in ../lib)
$(PROJ).elf : $(OBJS)
	$(LD) $^ $(LDFLAGS) -L../lib -lfoo -o $@
Of course, these archives can get pretty big if you dump a lot of stuff in there. You might wonder if all of it is linked when you add a library to your project. The answer is no, it is not. The linker is smart enough to use only the files which functions you're actually referencing. In the case of this demo, for example, I'm using various text functions, but none of the affine functions or tables, so those are excluded. Note that the exclusion goes by file, not by function. If you only have one file in the library (or #included everything, which amounts to the same thing), everything will be linked.
I intend to use tonclib in a number of later demos. In particular,
the memory map, text and copy routines will be present often. Don't
worry about what they do for the demo; just focus on the core content
itself. Documentation of tonclib can be found in the tonclib folder
(tonc/code/libtonc) and at
http://www.coranac.com/man/tonclib/.
Now that I am using tonclib as a library for its text routines, I
might as well use it for its copy and fill routines as well. Their
names are memcpy16() and memcpy32() for
copies and memset16() and memset32() for
fill routines. The 16 and 32 denote their preferred datatypes:
halfwords and words, respectively. Their arguments are similar to
the traditional memcpy() and memset(),
with the exception that the size is the number of items to be
copied, rather than in bytes.
void memset16(void *dest, u16 hw, uint hwcount);
void memcpy16(void *dest, const void *src, uint hwcount);

void memset32(void *dest, u32 wd, uint wcount) IWRAM_CODE;
void memcpy32(void *dest, const void *src, uint wcount) IWRAM_CODE;
These routines are optimized assembly so they are
fast. They
are also safer than the dma routines,
and the BIOS routine CpuFastSet().
Basically, I highly recommend them, and I will use them wherever
I can.
In most cases, you can change the order of the options and files freely, but in the linker's case it is important the object files of the projects are mentioned before the linked libraries. If not, the link will fail. Whether this is standard behaviour or if it is an oversight in the linker's workings I cannot say, but be aware of potential problems here.
Tilemaps are essential for most types of GBA games. They are trickier to get to grips with than the bitmap modes or sprites because there are more steps to get exactly right. And, of course, you need to be sure the editor that gave you the map actually supplied the data you were expecting. Fool around with the demos a little: run them, change the code and see what happens. For example, you could try to add scrolling code to the brin_demo so you can see the whole map. Change screen blocks, change charblock, change the bitdepth, mess up intentionally so you can see what can go wrong, so you'll be prepared for it when you try your own maps. Once you're confident enough, only then start making your own. I know it's the boring way, but you will benefit from it in the long run.
| Prev | Contents | Next |
| Objects | Affine matrix |